Mortise Lock Installation Guide for Smart Door Projects
A practical mortise lock installation guide covering door measurement, lock-body alignment, strike preparation, electronic wiring, commissioning, and maintenance for smart door projects.
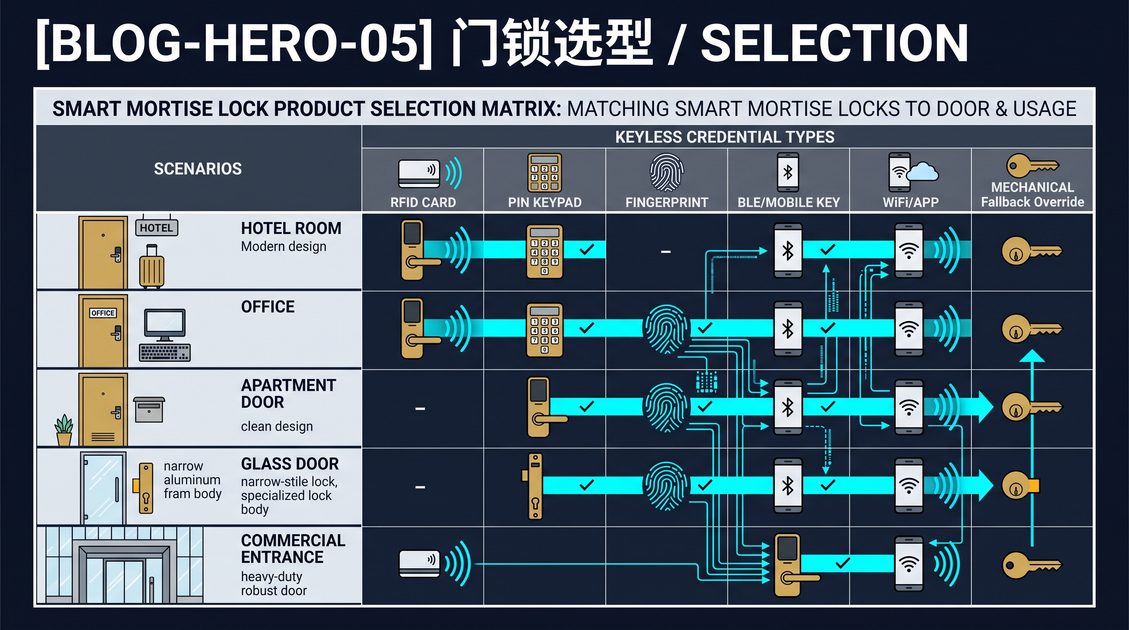
A mortise lock installation guide should begin with the complete opening, not with the lock body alone. A mortise lock is fitted into a pocket cut into the door edge, and reliable operation depends on the relationship between the door, frame, strike, hinges, handle, closer, and lock body. For an electronic mortise lock, the installation also includes the reader, actuator, battery or power supply, credential configuration, and emergency-release path. The installer should verify door thickness, backset, handing, pocket dimensions, strike position, clearances, fire rating, and egress requirements before drilling or cutting. This guide presents a practical sequence for planning, fitting, wiring, commissioning, and maintaining a smart mortise lock without assuming that one model fits every opening.
Mortise Lock Installation Guide: Survey the Opening
A successful mortise lock installation starts with a documented door survey. Measure the door thickness, backset, lock-pocket height and depth, edge-bore position, handle height, and distance to the frame. Record whether the door is left- or right-handed, single- or double-acting, and whether a closer, panic device, weather seal, or access-control cable affects movement. Check that the frame is square and that the existing strike lines up with the latch and deadbolt. A lock may appear compatible in a catalog while failing because the pocket is too shallow or the strike is offset.
For a replacement or retrofit, photograph both faces and the door edge before removing hardware. Preserve the existing lock, screws, templates, and measurements until the new system has been tested. Rated doors, emergency exits, glass doors, and metal doors may require qualified review before modification. Do not enlarge a pocket or drill a fire-rated opening without confirming that the alteration preserves the door assembly’s required function.
Mortise Lock Installation Guide: Prepare the Lock Pocket
Use the manufacturer’s actual template or engineering drawing to mark the pocket and faceplate. A mortise pocket should be straight, deep enough for the complete lock body, and free from chips that could interfere with the case. Avoid removing unnecessary material because a loose lock body can move under repeated handle use and cause latch misalignment. The faceplate should sit flush with the door edge, and the retaining screws should engage solid material rather than stripped or weakened holes.
Before installing the electronics, test the mechanical movement. Insert the lock body, fit the handle spindle and cylinder or thumbturn where applicable, and operate the latch and bolt with the door open. Movement should be smooth and should not require unusual force. If the mechanism binds before the electronics are added, do not try to solve it through software or motor settings; correct the pocket, spindle, or door alignment first.
Mortise Lock Installation Guide: Fit the Strike and Hardware
The strike is as important as the lock body. Mark its position with the door closed and verify that the latch enters without scraping. A strike that is too high, too low, or too deep can make an electronic motor work harder and can prevent the door from locking reliably. Reinforce the frame when required, using the specified fasteners and keeping the strike firmly connected to structural material. Check the door seal and closer because excessive closing pressure can hide an alignment problem until the lock is powered.
Install handles, escutcheons, cylinders, thumbturns, and readers according to the hardware drawing. Keep cables away from moving spindles and bolt paths. On a battery lock, ensure the battery compartment remains serviceable after the trim is fitted. On a wired lock, route conductors with strain relief and protect them from sharp edges. Never leave a cable pinched between the door and frame unless the design explicitly provides a protected transfer solution.
Mortise Lock Installation Guide: Connect and Configure Electronics
After mechanical fitting, connect the reader, actuator, battery, controller, and any gateway or access-control interface. Confirm polarity and connector seating before applying power. The configuration should identify the lock, set handing if required, enroll an administrator, and define the permitted credentials. Keep installer credentials separate from operating credentials and record the final configuration for future service.
Test the lock with the door open before closing it. Verify valid and invalid credentials, manual inside release, auto-lock behavior if enabled, low-power warnings, and the emergency key or backup-power method. For networked systems, test both connected and offline behavior. A smart mortise lock should fail in a documented and safe way when the network is unavailable; it should not depend on a live connection for every local unlock.
Mortise Lock Installation Guide: Commission the Door
Commission the complete opening, not just the lock. Test the door from both sides with valid, expired, revoked, and invalid credentials. Test repeated failed attempts, door-position sensing, schedules, manual override, power interruption, and network loss. Confirm that the door closes without excessive force and that the latch and bolt fully engage. For staff or hotel installations, test representative doors from each hardware batch rather than approving one sample for an entire property.
Record the model, firmware, credentials administrator, measurements, test results, and maintenance owner. Train the people who issue credentials and respond to low-battery or lockout events. Schedule an early follow-up inspection because screws can settle and alignment can change after repeated cycles. A disciplined commissioning record makes future replacement and troubleshooting much faster.
Mortise Lock Installation Guide: Maintenance and Safety
Maintenance includes checking alignment, fasteners, handles, strikes, seals, battery status, firmware, and administrator permissions. Clean the reader and exterior trim with materials approved by the manufacturer, and do not apply an unspecified lubricant to electronic or mechanical components. Investigate rough operation promptly, because a binding door can reduce battery life and damage the actuator.
This mortise lock installation guide is general information, not a substitute for the manufacturer’s instructions or qualified local review. Fire, accessibility, electrical, privacy, and emergency-egress requirements vary by jurisdiction and opening type. Obtain the required professional assessment before modifying a rated or emergency opening.
Not sure which sensor fits your project?
Talk to our mmWave application engineers for a free consultation.
Specify your hotel project with our engineers
Send your room count, ceiling type, and protocol preference. We will return a sample plan and quote within 24 business hours.
- Move from general guidance into a product or application discussion.
- Use RFQ when pricing, drawings, MOQ, or launch timing needs structure.
- Keep a direct contact path visible for fast clarifications and handoff.