商业建筑门禁系统指南:组件、规划、集成与成本控制
一份实用的商业建筑门禁控制指南:涵盖组件解析、凭证类型、规划步骤、系统集成、生命周期成本,以及设施团队可落地的实施清单与采购建议。
商业建筑门禁系统指南
商业建筑门禁控制是一套协同运作的锁具、读卡器、凭证、控制器和管理软件的组合,用于决定谁可以进入建筑及其内部区域,并记录每次放行或拒绝的时间。一套完整的系统覆盖主入口门、内部办公门与储物室门、电梯和装卸区,将它们连接到一个集中平台,由该平台发放凭证、在员工离职时吊销凭证,并为安全与合规保留审计追踪记录。典型部署在每扇受控门上安装一把电控锁或电磁锁、一个门禁读卡器,以及一个对照本地或云端数据库验证凭证的控制器。实际价值在于远程管理、即时吊销和机械钥匙无法提供的使用报告,这正是商业建筑门禁决策由生命周期成本和集成能力驱动、而非只看锁具硬件本身的原因。现代实施通常涉及十几扇到几千扇门,每扇门都有各自的框体材质、电源条件和安全义务,因此本指南的宗旨是为你提供一套可重复的思考方法,用来逐一推敲这些决策。
在货比三家之前请先读完本指南,因为采购是一个系统决策,而不是硬件决策。在筛选供应商之前,先界定门洞、框体材质、用户数量、威胁模型、凭证类型、电源、安全联动、集成目标、环境暴露、维护责任方和生命周期预算。然后用一扇有代表性的门和针对当前型号的文档来验证你的假设。
商业建筑门禁系统核心组件
商业建筑门禁系统由五个相互作用的层级构成:门上的锁定硬件、凭证读卡器、门控制器、布线或无线路网络,以及保存门禁数据库的管理软件。锁定层通常是断电开或断电闭的电插锁、电控插芯锁,或安装在门框或门扇上的磁力锁。读卡器层采集凭证,如卡、键盘 PIN、手机凭证或生物识别样本,并将其转换为令牌。控制器层将令牌与存在本地或云端的门禁权限进行比对,并据此驱动锁定层。出门请求设备、门位传感器和手动越权装置补全了物理实景。只要这些层级匹配得当,就能为整栋建筑交付一套统一连贯的权限模型,因此,在选硬件之前先理解每一层,就是成体系方案与一堆不兼容零件之间的分水岭。
一个常见的误区是把锁和读卡器当作同一个产品。实际上,定义门禁策略的是控制器和软件,所以在确定具体锁体之前,先确认管理平台支持你设施所需的门数、凭证持有人数和报表深度。
锁定硬件层
锁定层是真正把门锁住的物理约束装置,有三种主流形态。电插锁安装在门框上,取代或补充锁舌扣板;通电时释放锁舌,门不必转动把手就能打开,因此是木质或空心金属门框的自然选择。电控插芯锁是内部集成电动释放机构的完整机械锁体,门在机械上仍可上锁,而且从室内一侧随时可开启以保障逃生。磁力锁有时称为磁锁,靠电磁铁吸住一块金属衔铁板,完全没有活动锁舌,适用于人流量大的双开门,但必须配合带监控的出门请求装置才能满足消防疏散规范。这三种形态都可以配置为断电开或断电闭,而这一个选择就决定了断电时会发生什么。
除了释放机构,锁定层还包括锁扣板、铰链加固和门框状况。脆弱的门框或错位的锁舌会让最强的锁也无能为力,因此现场勘察的一部分工作就是核实门框确实能承受锁具的额定力,并且门能正常关闭就位。内部门与外部门也有区别:外部门必须抵御暴力闯入、天气和反复滥用,而内部门主要只需阻止顺手牵羊式的闯入并记录事件。让锁定层匹配门洞的暴露程度,是任何项目落地中的第一个技术判断。
读卡器层
读卡器是用户接触或靠近的设备,它有意与锁分离,这样凭证技术升级时不必更换整扇门。读卡器按身份采集方式分类。卡和钥匙扣读卡器给应答器供电并读取其标识符。PIN 键盘只需输入数字代码。手机凭证读卡器通过低功耗蓝牙或近场通信与手机通信。生物识别读卡器采集指纹、人脸或掌纹。有些读卡器结合了其中两种方式,这是门端多因素认证的基础。
读卡器的安装位置与类型同样重要。安装在向外开的门上的读卡器会被门扇挤压;安装在露天位置的读卡器需要具备适应雨、冰和温度波动的环境等级。读卡器与控制器之间的通信也值得关注:现代读卡器通常通过两线总线采用 OSDP(一种安全的串行协议)通信,比传统的 Wiegand 接口更能抵抗凭证克隆和线路篡改。如果你正在改造一栋已有 Wiegand 布线的建筑,应计划验证该链路的安全性,或者将其更换。
控制器层
控制器是每组门的大脑,也是最常被低估的部件。它存储所辖门的访问权限,验证出示的凭证,并驱动门锁。控制器将决策保存在内存中,这样网络或服务器宕机时不会把所有人锁在门外;这种本地决策能力正是中央平台临时故障期间门禁仍能继续运作的原因。控制器还管理门位传感器和出门请求装置,解读防撬和强制开门信号,并缓冲事件直到能够送达服务器。
控制器的选型取决于门数和拓扑结构。单个控制器可以管理一扇门,也可以管理同一区域的一组门,这样能缩短布线距离并集中供电。每个控制器都需要一个额定功率足以驱动所带锁具和读卡器的电源,而且越来越需要一条通向管理服务器的网络连接,要么走建筑的 IP 网络,要么走专用总线。控制器的数量、机柜位置和电池后备共同决定了系统的大部分韧性,因此控制器层的物理设计与软件设计值得同等程度的规划。
网络层与管理软件层
最后两层把各个门连成统一系统。网络层把事件从控制器传到服务器,把命令从服务器传到控制器;它可以是建筑现有的以太网、专用门禁总线,或者有线和无线门控制器的混合。管理软件层保存集中门禁数据库、凭证持有人记录、审计日志,以及管理员用来授予和撤销门禁权限的用户界面。门禁时段、节假日历、防反传规则和报警处理都在这一层配置。
软件是大多数商业建筑门禁决策最终汇聚的地方,因为它是表达策略的唯一场所。在选择任何硬件之前,先确认软件支持你的门数、凭证类型、报表需求和集成目标,因为事后换软件远比换读卡器昂贵。
商业建筑门禁系统凭证选型
凭证是你的系统所识别的身份,所选凭证类型决定了安全性、便利性和成本。感应卡和钥匙扣使用 125 kHz 或 13.56 MHz 应答器,发放成本低,但可能丢失或被共用。13.56 MHz 智能卡增加了加密功能,可承载多种应用。手机凭证推送基于手机的令牌,无需制卡即可远程发放和撤销门禁权限。PIN 键盘简单便宜,但依赖代码的保密性。生物识别读卡器将门禁权限绑定到指纹、人脸或掌纹,是证明出示凭证者就是授权用户的最强依据,不过会增加传感器成本和隐私考量。有些读卡器结合了其中两种方式,这是门端多因素认证的基础。许多系统混合使用多种凭证类型,高安全门采用卡加 PIN,其余位置采用单一凭证类型,因此实际技能是选择与你的用户群体和威胁模型匹配的凭证类型,而不是选最便宜的选项。这些凭证类型共同决定了每扇门上的用户体验,也决定了系统生命周期内发放、更换和吊销身份所需的管理工作量。
选择凭证类型时,应针对真实的用户规模和流失率来判断。一个人员流动率高的租户大楼可能更看重即时手机发放能力,而一个低流量的设备机房用键盘就够了。凡涉及合规要求,应选择能记录哪张凭证在哪扇门什么时间被出示的系统。
卡与钥匙扣凭证
卡与钥匙扣凭证是行业的主力,因为便宜、耐用且易于规模化。最老的系列工作在 125 kHz,本质上是一个只读标识符;它简单便宜,但对克隆几乎没有什么防护力,因此不太适合高风险设施的室外周界。较新的系列工作在 13.56 MHz,包含支持加密的卡片,读卡器与卡片之间进行双向挑战-应答交换,令复制凭证的难度大大增加。高安全变体增加了更强的密钥管理,数据中心和研究空间等场所通常要求使用这类产品,因为复制的胸卡在这些地方是不可接受的风险。
许多组织把 13.56 MHz 智能卡作为统一标准,然后在同一张卡上叠加其他应用,比如食堂小额支付钱包、复印机授权或考勤功能。一卡多能降低了发卡成本和用户摩擦。卡片本身也成为必须订购、打印、追踪和吊销的实物库存项目,这就是为什么卡片管理软件和规范的发卡流程是成熟体系的组成部分。
手机凭证
手机凭证用推送到智能手机的令牌取代塑料卡,改变了发放和吊销的经济性。由于令牌通过空中传送,新员工可以在到岗前就完成开通,离职员工可以即时吊销,无需回收实体胸卡。对于租户或员工流失率高的大楼,仅此一项就足以收回系统成本。手机凭证对丢失的应对方式也不同:捡到手机的人不太可能因此获得门禁权限,因为手机本身通常有锁屏保护。
代价也现实存在。用户必须携带电量充足的手机,大楼必须提供开通和管理手机应用的方式。手机凭证与低功耗蓝牙读卡器天然搭配,并且能与身份平台集成,使同一个应用跨越多个建筑携带门禁权限。注重隐私的组织应记录手机定位信息的用途,确保凭证平台不会在授权记录的门禁事件之外追踪员工。
PIN 键盘与生物识别
PIN 键盘是最早的电子凭证,在注重简单和成本的场景中仍有价值,比如设备机房或小型租户套间。PIN 的吊销很简单,删掉代码即可,但也容易被分享或窥视,因此键盘应留给敏感度较低的门洞使用,除非与卡片组合作为第二因素。
生物识别读卡器将门禁权限绑定到身体特征,是门端最强的身份证明,因为凭证不能像卡那样出借或复制。指纹、人脸和掌纹读卡器各有不同的隐私预期和环境敏感度,并且都需要登记注册,增加了入职时间。生物识别数据的处理必须有明确政策,而且在许多司法辖区,生物识别模板的存储受到监管。常见做法是:在高安全内部门使用生物识别,在周界依赖卡或手机凭证,因为那里的通行效率和天气因素更重要。
商业建筑门禁系统规划步骤
规划一套商业建筑门禁系统有一个可重复的顺序。第一步,盘点所有需要受控的门洞,并归类为周界、内部或高安全。第二步,定义用户角色和每个角色可进入的区域,决定门禁是否基于时段、基于层级或两者兼有。第三步,选择凭证类型和失效模式,记住断电开锁在断电时释放以允许逃生,而断电闭锁保持锁止,适合外部门。第四步,规划网络,在有线控制器和无线锁之间做决定,并确认每扇门都有电可用。第五步,选择与门数和报表需求匹配的管理软件。最后,安排调试、员工培训和全面上线前的试运行。按顺序完成这些步骤可以避免最常见的改造失败,因为每个决策都约束下一个决策,跳步前进会在后续阶段迫使你付出高昂的返工代价。
最先要搞对的就是失效模式决策,因为它关乎生命安全,而且事后很难更改。请与合格的专业人员确认当地消防和无障碍法规,因为疏散要求和残障通行法规可能覆盖默认的失效模式。
盘点门洞与区域
规划过程从完整盘点门洞开始,盘点质量决定后续一切。走遍建筑,记录每一扇需要控制的门,包括主入口、内部办公室门、会议室、储物间、设备机房、楼梯门和装卸台。对每个门洞,记录门框材质、门扇类型、是否双开、开启方向、是否有逃生推杠,以及周边环境。这些细节决定哪把锁可以安装、哪种读卡器能在这个位置存活。
门洞盘点完成后,把它们按表达安全策略的区域分组。区域是一组共享相同门禁权限的门和空间,比如公共大堂、普通办公楼层、服务器机房和装卸台。尽早定义区域可以让你用"区域到角色"的映射来表达策略,而不是逐门列表,后者在组织重新调配空间时更难审计和更难修改。每个门洞随后被分配到一个区域,并在该区域内获得失效模式、凭证要求和时段。
定义角色、时段与门禁级别
区域确定后,定义在其中流动的角色。角色是一组命名的权限集合,比如员工、承包商、访客或设施人员。每个角色被映射到它可以进入的区域和时段,生成一个门禁级别,系统将它应用到该角色的每位持有人。基于时段的门禁限制凭证何时有效,比如正常工作时间或特定班次;基于级别的门禁限制凭证能到达哪些区域,比如高管可以进入服务器机房而普通员工不能。
大多数系统允许同时使用这两个维度,大多数组织也应该这样做,因为安全计划的强度取决于最小权限纪律。清晰角色的审计价值在于:对角色的修改会同时更新每位持有人,所以当某个部门换楼层时,你调整一个角色而不是几百张个人卡。规划期间还应决定节假日、非工作时段访问和紧急越权的行为方式,因为这些边界情况正是实际策略最常出问题的地方。
选择失效模式
失效模式是整个计划中最具后果的实体决策,因为它是生命攸关的选择,事后逆转代价高昂。断电开锁在断电时释放,住户始终能逃生,门不会在紧急情况下困住任何人;这几乎是每一扇内部门和大多数疏散路径的正确默认。断电闭锁在断电时保持锁止,保护门洞,但除非配备机械释放、逃生推杠或电池后备,否则可能困住住户;这适合外部周界和高安全门,因为在断电期间给门洞提供保护比便利更重要。
疏散和无障碍法规通常规定哪种失效模式可以接受,这些法规因司法辖区而异,因此计划应在订购硬件前由合格专业人员审查。凡出于生命安全要求采用断电开锁的地方,你还需要可靠的电源,并且通常需要带监控的出门请求装置,以免短暂断电后门就一直敞着。在规划阶段就搞对失效模式,可以避免整个项目中最昂贵的一次返工。
规划电源与网络
每扇受控门都需要电源,而且大多数设计还需要网络连接,这两者都不能想当然。有线控制器需要额定的本地电源来驱动所带锁具和读卡器,还需要一条通往管理服务器的网络路径。无线锁避免了向锁具布线,但消耗电池,必须按计划更换,而且仍然需要某种形式的网络连接来传输事件和配置。规划任务就是逐门走查,决定哪种拓扑可行,然后确认电源确实存在或可以引入。
电池后备值得特别关注,因为建筑断电不应完全禁用门禁。至少,周界门上的控制器应配备后备电源,其容量足以撑过停电,而出门请求和疏散路径必须依靠自身电源保持可用或处于断电开启状态。逐控制器、逐门记录电源预算是规划阶段的交付物,而不是调试期间才发现的问题。
商业建筑门禁系统集成
集成把一把门锁变成楼宇系统。一个集成良好的门禁平台与视频监控交换事件,因此门被强推报警会附带相关的摄像头片段。它与 HR 目录同步,因此离职员工自动失去权限,新员工无需管理员逐门操作即可开通。它对接访客管理、电梯控制和照明或暖通空调调度,因此一次进门事件可以触发楼层照明,或者门禁权限可以限制一张卡到达哪些楼层。OSDP 等读卡器开放标准和 REST 或 Webhook 等软件 API 让你避免供应商锁定,并可在后期扩展系统。集成点应在规划期间就确定,而不是在安装之后,因为改造更贵且引入兼容性风险,而且平台的完整价值只有在事件能在系统间流动时才能实现。
确认你计划连接的每个第三方系统都暴露了门禁平台所期望的接口,并记录数据流,这样你就知道共享服务离线时会发生什么。
视频监控集成
门禁和视频监控是天然搭档,它们之间的集成通常是一栋楼能做出的最高价值连接。当门禁系统检测到门被强推、门长时间保持开启或敏感门上有被拒凭证时,可以触发监控系统抓拍那一刻并把片段标记出来供审查。结果是安保人员调查事件录像而不是光秃秃的报警。这种配对还支持对正常活动的验证,比如确认装卸台的刷胸卡动作对应装卸门的一次送货。
这种集成通常通过共享事件总线或 API 完成,门禁事件被推送到视频平台,由平台将事件对应到摄像机时间码。一个实用的设计决策是把读卡器本身纳入摄像机画面,这样视频既拍到人,也拍到他开的那扇门。要确定哪些事件应触发视频录像,以及片段保留多长时间,因为无限制录像成本高昂,而且大多数事件并不需要录像。
HR 目录与身份同步
门禁中最有价值的一项自动化是与 HR 目录的同步,因为它堵住了人工管理总会留下的两个缺口:新员工的开通和离职员工的吊销。当身份平台作为唯一事实来源时,员工的卡或手机凭证在入职时自动发放,其角色映射到门禁级别,其权限在人事记录变更的那一刻被吊销。相比之下,人工管理取决于繁忙的管理员记得去操作,而离职员工多保持一天门禁权限都是不可接受的风险。
集成是双向的纪律。门禁系统消费身份数据流,并返回 HR 或安全部门可用于报告的事件数据。实施之前,商定 HR 属性与门禁角色之间的映射,定义承包商和访客的处理方式,并决定身份数据流不可用时的行为。设计良好的同步能让新员工入职和离职终止都变得常规、可预测且可审计。
访客管理、电梯与楼宇自动化
门禁还连接到更广的楼宇系统,有几项集成值得明确规划。访客管理软件可以在来宾登记时发放临时凭证,让访客只能进入大堂和会议室,并在访问结束时自动使权限过期。电梯控制使用门禁权限决定一张凭证可以选择哪些楼层,因此能打开大门的卡不一定能到达每一层。楼宇自动化可以对门禁事件作出响应,在预定进入前开启某个空间的照明和暖通,空间无人时再回到节能模式。
每项集成都是一份定义了数据流的契约,每项都应在调试时测试。反复出现的主题是:门禁事件是占用和人员流动信息的丰富来源,而楼宇只有在集成被预先设计好的情况下才能利用这些数据。记录每个第三方接口,并定义访客平台或电梯控制器等共享服务离线时系统的行为,这样失效模式是已知的,而不是事后发现的。
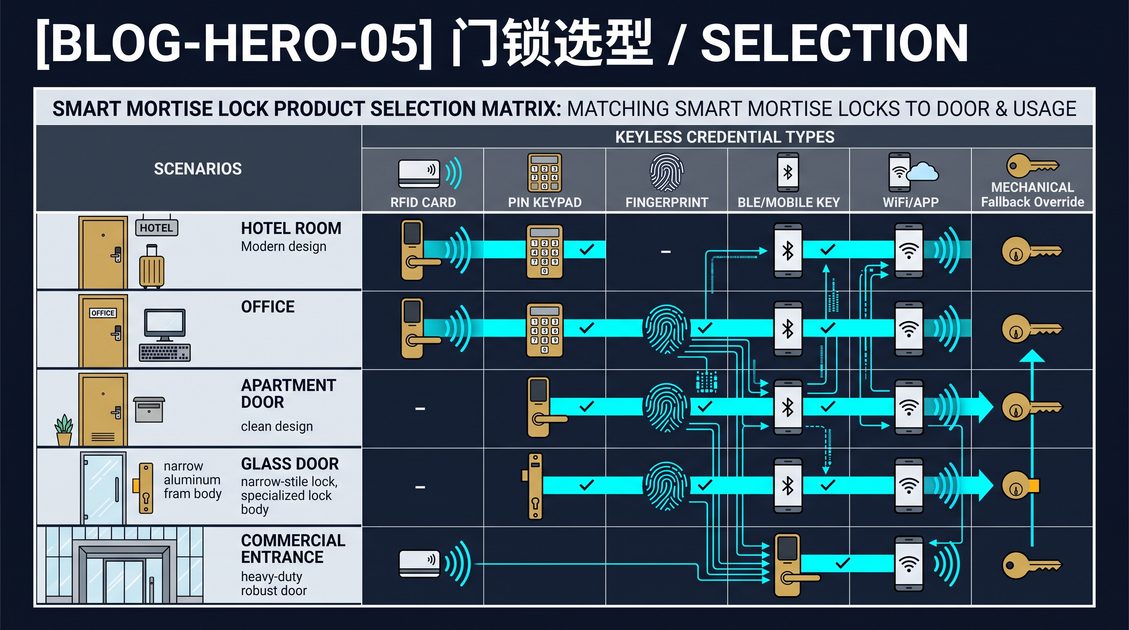
商业建筑门禁系统门洞类型与硬件选择
并非建筑里每扇门都应采用相同的安防方式。最有用的规划习惯之一是按门洞在周界和内部安防模型中的角色对其分组。主入口、内部办公室门、楼梯和设备门、装卸台各有不同的流量特征、暴露程度和安全义务,因此每一类都应有不同的硬件推荐。周界门洞面向外部世界,必须抵御强行闯入,同时还要应对持续人流和天气;内部门洞主要阻止顺手牵羊式的闯入并承担疏散义务;装卸台等服务型门洞则在安全与作业速度之间取得平衡。按门洞类型规划还能让设计可审查,因为审查者可以检查某一类的每一扇门都被一致处理,而不是逐一追溯每个决策,同时它迫使安全强度、通行效率和维护之间的权衡对每一类门都公开说明。
周界与主入口门洞
主入口门是建筑的门面,通常也是系统人流量最大的门洞,因此优先级是通行效率、外观和可靠的生命安全行为。常见设计是室外读卡器搭配断电开的电插锁或电控插芯锁、内侧出门请求装置,以及用于检测门被强推或长时间开启的门位传感器。由于入口服务大量用户,读卡器位置和安装高度必须经过规划,让卡和手机凭证能顺畅出示,用户不会拥挤堵塞。
周界门洞还必须抵御攻击。门框、锁扣板和门扇共同决定门洞的抵抗力,强锁配弱框算不上安全。周界门上的读卡器应使用能抵抗克隆的凭证技术,比如 13.56 MHz 智能卡或手机凭证,读卡器到控制器的链路也应安全。室外读卡器需要适合雨淋和温度波动的环境等级,断电开的周界锁的电源需要有后备,这样入口不会在断电时过早释放或失效关闭。
内部办公门与高安全门
内部门是门禁策略的主要表达场所,承载的义务与周界不同。大多数内部门应为断电开,以便住户始终能够逃生,它们通常使用比周界等级低一些的锁,因为面对的威胁是顺手牵羊而不是暴力攻击。电控插芯锁在内部办公室门上很常见,因为它让门保持机械可上锁,日常通行时保留熟悉的把手,电动释放由控制器驱动。
高安全内部门,比如保护服务器机房、数据中心、实验室或现金处理区的门,需要更强力的组合。这些门通常使用更高强度的锁定层、卡加 PIN 或生物识别读卡器等双因素凭证、带监控的门位传感器,以及严格限制时段的日程。高安全门的审计日志应记录每次授予和拒绝,带时间戳和身份信息,因为发生安全事件后最可能被检查的就是这些门洞。为高安全门选择硬件,很大程度上就是同时强制强认证和完整日志。
装卸台与服务门洞
装卸台和服务门洞是特殊的一类,因为它们把持续运营流量与显著的安全暴露结合在一起。装卸台是送货人员、承包商和维护人员进入的地方,往往也是建筑里最不受控的点之一。设计目标是让授权通行快捷,同时让未授权进入变得困难,这通常意味着:为持有凭证的人员设置读卡器、受监控的室外区域,以及一套处理无预约送货和装卸门的明确流程。
装卸台的物理约束与办公室门不同。装卸台门洞大、暴露在天气中,而且通常使用卷帘门或其他自己的机构而不是传统锁舌。因此,装卸台的门禁可能监管卷帘门的释放和旁边的人行门、记录送货事件,并与访客或供应商管理流程集成,以便筛查无预约到达者。装卸台还应有明确的"门保持开启"处理流程,因为装卸门敞开是建筑同时失去安防和空调冷气的常见方式。
商业建筑门禁系统时段、防反传与系统规则
除了决定谁能进入,成熟的门禁项目还用规则来治理进入的发生时间和方式,这些规则在管理软件中配置。最常见的规则包括:门禁时段,限制一张凭证在哪些日期和时间有效;节假日历,叠加在常规时段之上;防反传,防止同一张凭证被用来重复进入某个区域;以及将用户绑定到班次的时间区。每一条规则都是策略的表达,每一条都应该被设计、记录和测试,而不是不加思考地默认启用。这些规则的价值在于把一份静态的"谁能进哪里"清单变成与建筑实际运营相匹配的活策略;风险则在于,配置错误的规则可能把合法用户锁在门外,或者悄悄放行一次入侵——这就是为什么规则变更应遵循与硬件变更相同的变更控制和测试纪律。
时段与节假日历
门禁时段是最基本也最常用的规则。时段定义一扇门何时可用,它可以应用在门上,让某扇门只在工作时间可用;也可以应用在用户角色上,让倒班工人只在自己的班次内有权限。组合时段可以让一扇门在工作时间对所有人生效,非工作时间只对维护角色开放,这是经典的办公室配置。
节假日历叠加在常规时段之上,而且是出错的常见来源,因为建筑遵循的地区和组织节假日每年都会变化。好的实施应在软件中维护一份节假日历,每年审查一次,并在节日到来之前测试节假日行为确实符合预期。时段还与审计日志交互,因为非工作时间的拒绝事件往往是最早的问题信号,因此配置应该为授予和拒绝都产生有意义的事件。
防反传与尾随缓解
防反传是一条规则,防止一张凭证被重复用来离开安全区域,它杜绝了一个人进入后把卡递给另一个人的做法。最严格的形式是:一旦凭证被用来进入某个区域,在它离开之前就不能再次进入;较宽松的形式是系统检测到该模式时发出报警或记录警告。防反传在高安全区域最有价值,在公共区域价值最低,因为那里可能产生令人沮丧的误报。
防反传本身无法阻止尾随——未经授权的人抢在授权人身后、门关闭之前溜进去。缓解尾随需要物理控制,比如互锁门、旋转闸机或带报警响应的门位监控,这些最适合与前面讲的视频集成结合,让报警带着画面被调查。规划防反传和尾随控制意味着决定哪些区域真正需要这些措施,因为它们会增加运营摩擦,应当只保留在风险足以证明其合理性的地方。
商业建筑门禁系统电源、布线与控制器设计
门禁系统的物理基础设施是项目最常延误和超预算的地方,因为它在销售比较里看不见,在安装时却完全暴露。电源、布线和控制器位置决定设计是否实用、可维护和有韧性,每一项都在安装成本与持续维护之间做权衡,同时又与建筑现有的线管、竖井和配电间相互作用。计划应为每扇门明确电源来源、通信方式和所辖控制器,并以未来技术人员能理解的方式记录这些决策。三个反复出现的基础设施决策塑造设计:有线锁与无线锁、集中式与分布式控制器,以及电源和网络的性质与冗余。在规划阶段就把这三件事做对,才谈得上项目按时完工、系统在全生命周期内可维护。
有线锁与无线锁
有线锁直接连接到控制器和电源,带来可靠的电力、即时通信和无需更换电池,代价是向每扇门布线。对于存在线管、竖井和吊顶空间可以走线的商业建筑,有线设计是传统选择,而且在门较集中、附近有电源的地方,它仍然是最优方案。持续成本低,因为没有电池可换,固件可以通过网络集中管理。
无线锁使用电池和无线链路,省去了布线,在那些拉线不现实或被建筑结构禁止的门上,让改造便宜得多。代价是定期更换电池、需要监控电池状态,以及可能受距离和干扰影响的通信介质。无线锁是历史建筑或租约建筑内部门的强选项,因为这类建筑限制结构改动,而且无线锁越来越多地与周界有线控制器组合使用。这个决定本质上是布线可达性与维护之间的取舍,应该逐门做出,而不是全局一刀切。
控制器位置与机柜设计
控制器通常安装在受控门附近的机柜里,这些机柜的布局决定需要多少线缆,也决定系统维护的便利程度。分布式设计把控制器放在每簇门附近,缩短线缆长度,但硬件分散在整栋楼;集中式设计把控制器集中到几个安全的房间,集中电源和网络基础设施,但需要更长的线缆连接到远端的门。大多数建筑最终采用混合方案,把控制器放在靠近门簇的电气间或 IDF 配线间。
每个控制器机柜都需要明确的电源预算、网络接口和物理安全,因为放在未上锁机房的控制器是现成的攻击点。机柜应为增长预留空间、贴好标签,并用示意图记录它驱动哪些门。电池后备应在机柜层面设计,这样一次停电不会让整个楼层瘫痪,设计应说明每个机柜必须依靠后备电源运行多长时间。
电源容量与后备
电源是门禁系统中最容易出故障的部分,它应得到与硬件同等的严谨对待。每把锁、每个读卡器和控制器都有电流消耗,电源的容量必须覆盖所连负载并留出余量,包括几把锁同时通电时的浪涌。长线缆远端读卡器需要设备端有足够的电压,而不只是电源端有电,因此线规和距离都属于电源计算的一部分。
后备电源是用硬件表达的政策决策。周界和生命安全门需要足够的电池后备,以便在现实的停电时长内保持安全和可逃生;内部门可以按其失效模式行事。设计应明确后备时长、电池监控和测试流程,因为需要时掉链子的后备比没有更糟。逐机柜、逐门记录电源预算是合格安装所依赖的交付物。
商业建筑门禁系统网络安全与 IT 考量
现代门禁是一个联网的 IT 系统,这意味着它承担任何联网系统都有的安全义务。管理服务器、控制器和读卡器链路都是攻击面,被攻破的门禁系统就是通往物理入侵的直接路径。这方面的网络安全包括:保护管理服务器及其数据、保护服务器与控制器之间的通信、保护凭证及其背后的身份数据,以及与组织更广的 IT 安全态势集成。
安全团队与 IT 团队之间的对话往往是大楼规划过程中最有价值的部分之一,因为双方对同一个风险有不同视角。门禁供应商应提供加固指引,IT 团队应在部署前按照组织标准审查这些指引,而不是在事件发生后。
保护管理服务器
管理服务器保存门禁数据库、凭证记录、审计日志和管理界面,这使它成为系统的皇冠明珠,也是攻击的首要目标。它应按计划打补丁,为管理员启用强身份验证,并隔离在受控网络分段中,而不是暴露在普通办公网络。管理访问应限制到指定人员,所有管理操作本身都应被记录,这样对门禁权限的更改可以追责。
服务器还需要备份和恢复计划,因为丢失门禁数据库可能意味着重新开通建筑里每一张凭证。备份应经过测试、加密,并与生产服务器分开存放,计划应说明服务器故障后门禁可以在多快恢复。组织越来越多地把管理平台迁移到云端,这把部分责任转移给了供应商,但需要对供应商的安全、数据位置和访问控制做自己的尽职调查。
保护控制器与读卡器链路
控制器和读卡器链路是物理基础设施,但它们承载的信任级别与软件相同。处在未上锁机柜中的控制器可能被篡改或重新编程,因此控制器机柜应物理上锁并受监控。读卡器到控制器的链路尤其值得注意,因为传统 Wiegand 布线以可被截获或克隆的方式传输凭证数据;将读卡器迁移到 OSDP,该协议对读卡器链路进行加密和认证,能实质性地加固门端抵抗线路攻击。
读卡器和控制器上的固件必须保持更新,因为门禁硬件并非对漏洞免疫,未打补丁的控制器上的已知缺陷是长期风险。部署计划应包括固件更新和补丁管理流程,供应商合同应说明安全更新提供多长时间。把物理门禁系统纳入组织的 IT 资产清单,是让它在服务期限内保持安全的最有效方法。
身份数据与隐私
门禁系统保存敏感数据:谁被允许去哪里、什么时间、用什么凭证,还有姓名、标识符,可能还有生物识别模板。这些数据在许多司法辖区受隐私义务约束,部署应定义数据如何收集、存储、保留和删除。生物识别数据是最敏感的一类,其处理应遵循记录在案的政策,并在适用情况下遵守关于生物识别模板同意和存储的法规要求。
门禁事件数据对攻击者也有价值,因为它揭示占用和人员流动规律,因此审计日志应受保护、按适当期限保留,并且只允许授权人员访问。隐私和安全应写入采购需求,而不是部署后临时补救,因为给一个没有为数据保护而设计的系统加装数据保护既困难又昂贵。
商业建筑门禁系统单一租户、业权与多租户运营
门禁系统的运行方式取决于谁拥有和运营建筑,业权模式极大地改变需求。单一租户建筑中,占用者自己拥有系统,是一套需求;业主拥有的多租户建筑是另一套;而租户在业主管控的壳体内自行安装系统的建筑又有一套。尽早厘清业权模式可以避免最常见的是谁控制、谁付费、谁维护的纠纷。
业权模式还决定凭证、区域和集成的管理方式,以及是只需要单一平台还是需要多个平台。在多租户建筑中,业主通常控制共享周界和公共区域,每个租户控制自己的套间,两层可能运行在完全独立的系统上。
单一租户业权运营
在单一租户建筑中,占用建筑的组织通常拥有并运营门禁系统,这使它对策略、数据和硬件拥有完全控制权。优点是简单和可问责:一个团队定义角色,一个平台持有门禁数据库,一份合同覆盖维护。单一租户运营还让集成更简单,因为 HR 目录、视频和门禁系统由同一组织管理,可以共享同一个身份来源。
单一租户部署的主要纪律是让系统随组织变化而保持对齐,因为为一套人员规模布局而建的系统往往在公司成长时被放任漂移。定期审查角色、区域和审计日志能让系统保持真实。单一租户业主还拥有升级和生命周期决策权,因此他们应规划读卡器和控制器的最终更换,而不是把系统当成一劳永逸。
业主持有的多租户运营
在多租户建筑中,业主通常拥有并控制周界系统、公共区域门、电梯和共享访客体验,而每个租户控制自己套间内的门禁。业主管控层设定建筑的运行标准,它必须容纳工作时间、员工规模和安全需求各不相同的多样化租户。周界平台可能为每个租户的员工和访客保存凭证,这使得规模化开通和吊销成为核心需求。
业主管控层与租户层之间的接口是最需要规划的地方。租户可以在自己套间内安装自己的读卡器和锁,业主必须决定这些租户系统是与建筑平台互通,还是独立运行。当它们独立运行时,业主仍然需要一种在紧急情况和维护时打开租户门的方法,因此协议应定义访问权、通知和责权。运营良好的多租户建筑把门禁当作一项边界清晰的共享服务,而不是一个归所有人所有的单一系统。
租户自装与混合模式
混合模式在租赁办公室和多功能开发项目中很常见:业主提供壳体和核心门禁,每个租户在自己的租赁空间内安装并运营一套独立系统。租户系统可能是一台小型商用控制器,或一组通过自己的软件管理的无线锁,完全在租户控制之下。这种模式给租户灵活性和隐私,代价是部分重复建设,并且与建筑平台缺乏集成。
实际挑战是协调和疏散。租户门仍然处在业主的消防和疏散设计之内,因此租户自装硬件必须满足建筑的安全要求,即使它不在业主的系统中。两套系统还需要商定例外处理流程,以便应急响应人员和物业管理在必要时能打开租户门。把跨边界规则写进租约和建筑运营程序可以避免日后冲突,而且这项任务最好在租户系统首次安装时完成,而不是在事故期间。
商业建筑门禁系统调试、验收与测试
硬件装好并不代表安装完成;系统经过调试、验收,并被证明在各种运行条件下行为正确,才算完成。调试阶段把设计假设拿到真实的门、真实的用户和真实的建筑上去检验,也是大多数缺陷浮出水面的阶段。一个结构化的调试与验收流程,配以书面测试证据,能把一次安装变成一套可以放心运营的系统。
调试应覆盖硬件、布线、电源、软件、规则和集成,并应有文档记录,使结果可审查,让物业经理继承一份已核验事项的记录。验收是业方签字确认系统符合规格的合同步骤,它应建立在实际演示的结果上,而不是建立在供应商的承诺上。
调试顺序
调试通常先逐门进行,再扩大到全系统。对每个门洞,安装人员核查锁具动作正常、读卡器读取预期凭证、控制器做出正确的授予和拒绝决定、出门请求和门位传感器上报正确。每扇门都要通过断电来测试失效模式,确认门的行为符合设计,因为一扇断电时仍然上锁的断电开门是必须在入住前抓出来的生命安全缺陷。
单门通过后,团队测试规则和软件:时段、节假日历、防反传、吊销和报警处理。最后,演练集成:用一张测试凭证触发视频片段,一次 HR 记录变更吊销门禁权限,一张访客凭证如期过期。每项测试都产生书面证据,调试报告记录每扇门、每项测试、每项通过或失败。这份报告是让验收决定成为可能的交付物。
验收与移交
验收是业方确认系统符合规格并承担运营责任的节点。一个运转良好的验收流程以调试报告为基础,然后增加一个试运行期,系统在正常运营中运行,缺陷被收集和修复。验收标准应在采购文件中事先约定,双方在工作开始前就知道"通过"是什么样子。
移交是运营转移,应包括对管理凭证的管理员和为门提供服务的技工的培训。业方应收到完整的竣工文档,包括逐门清单、电源预算、控制器布局、集成接口和恢复流程。一份没有文档移交的系统是没人能安全拥有的系统,因此移交质量是衡量安装质量的公平标尺。
商业建筑门禁系统维护、恢复与生命周期管理
验收之后,系统进入真正决定其实际成本与实际价值的阶段:运营。门禁很少是一劳永逸的安装,因为建筑在变、人在变、硬件在老化。维护计划、恢复预案和生命周期视角能让系统在其真正服务建筑的多年里保持安全和可靠,它们对商业论证的重要性不亚于最初的硬件采购。
维护既包括例行工作,也包括应急工作。例行工作包括更换电池、固件更新、读卡器清洁和凭证清理;应急工作覆盖锁具故障、读卡器损坏和报警响应。计划应定义谁来做、按什么节奏做、花多少钱,并定期审查,以便跟上建筑的变化。
例行维护与电池计划
对于无线锁,电池管理是最大的重复性维护项目,一套有纪律的电池计划能防止无线设计最常暴露的失效:因电池没电而停止响应的门。系统应监控电池状态并在锁失效前告警,维护日历应按厂家指导安排更换。由于电池在极端温度和高流量门上损耗更快,计划应按门况加权更换,而不是对每扇门一视同仁。
固件更新既是功能性维护任务,也是安全维护任务,因为它携带封堵漏洞的补丁。更新应遵循变更控制流程,先在样本门上测试再推广,并安排在人流量低的时间段,让短暂重启不干扰正常使用。读卡器清洁和检查简单但重要,因为表面受损或安装松动的读卡器迟早会失效,而脏污的生物识别传感器会让用户感到沮丧。
事件响应与恢复
恢复预案回答"发生故障时怎么办"的问题,最好在故障发生前写好。常见场景有控制器故障、网络中断、服务器丢失,以及凭证无法验证时的大规模锁死。对每个场景,预案应说明预期行为、谁响应、如何恢复门禁,并且必须经过演练,因为从未演练过的恢复预案通常会在需要它的那天失效。
预案还应覆盖不常见但后果严重的案例:门禁主数据库丢失主密钥、管理员账户被攻破,或疑似凭证系统被入侵。为这些事件制定书面流程,包括谁被授权采取紧急行动,能保护建筑并限制损失。恢复是门禁的最后一道防线,就像失效模式决策一样,提前设计好远比在事故中即兴发挥便宜。
生命周期预算与更换
门禁的生命周期视角把系统当作一项会折旧、有有限服务寿命的资产,而不是一次性采购。硬件到达寿命终点,软件停止支持,不升级的系统最终既是安全风险,也是运营负债。因此生命周期预算不仅包括最初采购和持续维护,还应包括读卡器、控制器和软件的最终更换,并且应预判更换所涉及的迁移工作。
合同条款为生命周期成本设定了上限。协议应说明固件和安全更新提供多长时间、结束支持日期是什么、备件是否仍然可得,以及供应商如何将数据和配置迁移到后续平台。在采购前就提出这些问题的建筑,能避免门禁中最昂贵的意外:因为现有产品走到了生命尽头且没有明确出路,被迫推倒重来。
商业建筑门禁系统采购与 RFP 指南
采购是规划工作获得回报的地方,因为一份规范良好的招标书能带来可比的报价和可辩护的决策,而一份糟糕的招标书带来的是风马牛不相及的报价和签约后纠纷。RFP 应描述建筑需要达成的结果、需要受控的门洞、凭证类型、集成目标、失效模式和疏散要求、服务与支持预期,以及本指南描述的生命周期条款。它应要求每家供应商回答同一份规格说明,这样报价可以在一致的基础上比较。
决策是一个系统决策,因此评审应至少像重视硬件价格一样重视软件、支持和集成能力。一份低硬件价配上弱软件或短支持,在系统十年的寿命里很少是划算的交易。
编写规格说明
一份有力的规格说明从规划阶段形成的门洞盘点和区域模型出发,把它们变成明确的需求。对每个门洞,规格说明写明锁定硬件、失效模式、读卡器类型、凭证类型和电源与网络假设,让每家供应商都对相同的范围报价。对软件,写明门数、用户规模、报表深度、集成接口,以及期望的管理和审计功能。
规格说明还应写明最重要的运营和生命周期条款:固件更新政策、结束支持承诺、服务响应时间、备件可用性,以及迁移到后续平台的流程。在 RFP 中把这些条款写清楚,才能让生命周期成本在供应商之间可比,也才能防止耗尽预算和信心的签约后意外。
评估与比较报价
在一致的基础上评估报价需要一个共同的评审框架,而框架应在报价到达之前定义好。显而易见的维度是价格,但它应作为生命周期成本来评估,包括硬件、安装、授权、凭证、维护和预计更换,而不是只看标价。其他维度包括:对照规格的能力、与建筑现有系统的集成适配度、支持的质量和可用性,以及供应商在安全更新和产品连续性方面的记录。
一个实用的技巧是要求每家供应商回答同一份问卷,并在现场或实操演示中展示其软件和集成行为,因为书面声明比运行中的系统更容易。中标的报价通常不是最便宜的;它是满足规格、适配集成目标,并提供建筑能承受的生命周期成本和支持承诺的那一个。用同样的字段为每家供应商构建对比表,能让决策透明且可辩护。
对比表
| 决策因素 | 为什么重要 | 有线系统 | 无线系统 |
|---|---|---|---|
| 安装成本 | 布线是改造价格的主要来源 | 较高,每扇门需要线管和电源 | 较低,无需向锁具布线 |
| 持续维护 | 决定生命周期成本 | 低,无电池可换 | 较高,需按计划更换电池 |
| 供电可靠性 | 锁具必须行为正确 | 可靠,由电源持续供电 | 依赖电池监控 |
| 改造友好度 | 历史建筑和租赁建筑 | 受结构限制 | 强,结构改动最小 |
| 事件延迟 | 报警和监控 | 即时 | 取决于无线链路 |
| 最佳适配门洞 | 让硬件匹配暴露程度 | 周界和高流量门 | 内部和结构受限门 |
| 凭证类型 | 安全性 | 便利性 | 发放成本 | 最佳适配 |
|---|---|---|---|---|
| 125 kHz 卡或钥匙扣 | 低,易克隆 | 很高 | 很低 | 内部、低风险区域 |
| 13.56 MHz 智能卡 | 较高,带加密 | 高 | 低到中等 | 一般商业默认 |
| 手机凭证 | 高 | 高,但需手机有电 | 规模化后很低 | 人员流动率高的建筑 |
| PIN 键盘 | 低,除非组合使用 | 低 | 极低 | 设备机房 |
| 卡加 PIN | 高,多因素 | 中等 | 低 | 高安全门 |
| 生物识别 | 很高 | 中等,需登记注册 | 中等到高 | 高安全内部区域 |
商业建筑门禁系统决策实务示例
为了让这套框架具体化,考虑一个中型写字楼改造的实例。建筑有一个主入口、一个装卸台,以及三层楼的内部门,租户群体稳定,约两百名员工,访客流量不大。目标是守住周界、控制装卸台、管理内部的角色和时段,并保留可辩护的审计追踪,全部在偏向可靠性而非最低初始成本的生命周期预算内完成。
分析从门洞开始。主入口采用断电开电插锁、带 OSDP 的 13.56 MHz 智能卡读卡器以抵抗克隆、出门请求装置和门位传感器,周界控制器配备电池后备。装卸台采用受监控的读卡器、带电控锁的人行门,以及对接访客管理集的访客与送货流程。内部门采用断电开电控插芯锁以保证逃生,服务器机房和现金处理区升级为卡加 PIN 并启用完整审计日志。
凭证统一采用 13.56 MHz 智能卡,同时把手机凭证作为可选,随着租户人员流动降低发卡成本。集成优先级提前设定:视频监控让强推门产生片段,HR 目录让门禁自动开通吊销,电梯让卡片只能到达其角色允许的楼层。生命周期预算包括:吊顶空间允许处采用免电池有线内部门锁,固件和安全更新条款写入合同,以及为读卡器寿命终点制定有文档记录的更换计划。
调试逐门进行并留下书面证据,每扇门的失效模式通过断电测试,集成测试覆盖强推门片段、HR 吊销和访客凭证按时过期。验收移交包括管理员培训、竣工逐门清单、电源预算和恢复流程。结果是:一套安全、成本和维护都是经过深思熟虑而不是被动继承的系统,未来的设施团队可以运营和扩展它,而不必从头重新摸索这栋楼。
在依据本指南行动之前,请与合格专业人员确认法律、消防、无障碍、网络安全和工程要求,并针对你要受控的门洞,用当前型号的文档验证每一个硬件选择。
本文部分内容由 AI 生成,并经人工整理与专业校验,以确保准确性与可读性。
Commercial Building Access Control Guide
Commercial building access control is the coordinated set of locks, readers, credentials, controllers, and management software that decides who may enter a building and its internal zones, and records when each entry was granted or denied. A complete system spans main entrance doors, interior office and storage doors, elevators, and loading bays, linking them to a central platform that issues credentials, revokes them when an employee leaves, and keeps an audit trail for security and compliance. Typical deployments combine an electric or electromagnetic lock on each secured opening, a credential reader at the door, and a controller that validates credentials against a local or cloud database. The practical payoff is remote administration, instant revocation, and usage reporting that mechanical keys cannot provide, which is why commercial building access control decisions are driven by lifecycle cost and integration rather than lock hardware alone. A modern implementation usually touches between a dozen and several thousand doors, each presenting its own frame material, power source, and safety obligation, so the discipline of the guide is to give you a repeatable way to reason about every one of those decisions.
Read this guide before you compare suppliers, because procurement is a systems decision rather than a hardware decision. Define the opening, the frame material, the number of users, the threat model, the credential family, the power source, safety dependencies, integration targets, environmental exposure, maintenance ownership, and the lifecycle budget before you shortlist vendors. Then validate your assumptions against a representative door and current model-specific documentation.
Commercial Building Access Control Guide Core Components
A commercial building access control system is built from five interacting layers: the locking hardware at the door, the credential reader, the door controller, the wiring or wireless network, and the management software that holds the access database. The locking layer is usually a fail-safe or fail-secure electric strike, an electrified mortise lock, or a magnetic lock mounted on the frame or leaf. The reader layer captures a credential such as a card, a keypad PIN, a phone credential, or a biometric sample and converts it into a token. The controller layer compares that token against access rights held locally or in the cloud and drives the locking layer accordingly. A request-to-exit device, a door position sensor, and a manual override complete the physical picture. Properly matched, these layers deliver a single, coherent permission model for the whole building, so understanding each layer before selecting hardware is the difference between a cohesive system and a pile of incompatible parts.
A common pitfall is treating the lock and the reader as one product. In practice the controller and the software are what define your access policy, so confirm that the management platform supports the number of doors, the number of credential holders, and the reporting depth your facility requires before committing to a specific lock body.
The Locking Hardware Layer
The locking layer is the physical restraint that actually holds the door shut, and it comes in three dominant forms. An electric strike is mounted in the frame and replaces or supplements the latch strike plate; when energized it releases the latch so the door opens without turning the lever, which makes it a natural choice for wood or hollow-metal frames. An electrified mortise lock is a full mechanical lock body with an electric release integrated inside, so the door remains mechanically latchable and can always be opened from the inside for egress. A magnetic lock, sometimes called a maglock, holds a metal armature plate with an electromagnet and has no moving latch at all, which suits high-traffic double doors but must be paired with a monitored request-to-exit device to satisfy fire egress codes. Each of these can be configured as fail-safe or fail-secure, and that single choice determines what happens in a power outage.
Beyond the release mechanism, the locking layer includes the strike plate, hinge reinforcement, and door frame condition. A weak frame or a misaligned latch compromises even the strongest lock, so part of the survey is verifying that the frame can actually withstand the rated force of the lock and that the door closes and seats correctly. Interior doors and exterior doors also differ: an exterior entry must resist forced entry, weather, and repeated abuse, while an interior office door mainly needs to deter casual intrusion and record events. Matching the locking layer to the opening's exposure is the first technical judgment in any rollout.
The Reader Layer
The reader is the device the user touches or approaches, and it is deliberately separated from the lock so that credential technology can evolve without replacing the entire door. Readers are grouped by how they capture identity. Card and fob readers energize a transponder and read its identifier. PIN keypads require a numeric code and nothing else. Mobile credential readers communicate with a phone over Bluetooth Low Energy or near-field communication. Biometric readers capture a fingerprint, face, or palm pattern. Some readers combine two of these, which is the basis of multifactor authentication at the door.
Reader placement matters as much as reader type. A reader mounted where the door opens outward will be pressed against by the leaf; one mounted in a weather-exposed location needs an environmental rating appropriate for rain, ice, and temperature swings. Reader-to-controller communication also deserves attention: modern readers commonly speak OSDP, a secure serial protocol, over a two-wire bus, which resists credential cloning and wire tampering far better than the legacy Wiegand interface. If you are retrofitting a building with existing Wiegand wiring, you should plan to validate the security of that link or replace it.
The Controller Layer
The controller is the brain of each door group and the piece most often underestimated. It stores the access rights for the doors it supervises, validates presented credentials, and drives the lock. Controllers hold their decisions in memory so that a network or server outage does not lock everyone out of the building; this local decision-making is what allows access to continue during a temporary failure of the central platform. Controllers also manage door position sensors and request-to-exit devices, interpret tamper and forced-door signals, and buffer events until they can be delivered to the server.
Controller sizing follows from door count and topology. A single controller may supervise one door or a cluster of doors in the same area, which reduces wiring distance and centralizes power. Each controller needs a power source rated for the locks and readers it drives, and increasingly it needs a network connection to the management server, either over the building's IP network or a dedicated bus. The number of controllers, their cabinet locations, and their battery backup together define much of the system's resilience, so the physical design of the controller layer deserves as much planning as the software.
The Network and Management Software Layers
The final two layers tie the doors into a single system. The network layer moves events from controllers to the server and commands from the server to controllers; it may be the building's existing Ethernet, a dedicated access-control bus, or a mix of wired and wireless door controllers. The management software layer holds the central access database, the credential-holder records, the audit log, and the user interface used by administrators to grant and revoke access. This is where door schedules, holiday calendars, anti-passback rules, and alarm handling are configured.
The software is where most commercial building access control decisions ultimately converge, because it is the single place where policy is expressed. Before selecting any hardware, you should confirm the software supports your door count, your credential families, your reporting needs, and your integration targets, because swapping software later is far costlier than swapping a reader.
Commercial Building Access Control Guide Credential Options
Credentials are the identities your system recognizes, and the family you choose shapes security, convenience, and cost. Proximity cards and fobs use a 125 kHz or 13.56 MHz transponder and are inexpensive to issue but can be lost or shared. Smart cards at 13.56 MHz add cryptography and can carry multiple applications. Mobile credentials push a phone-based token and let you provision and revoke access remotely without printing a card. PIN keypads are simple and cheap but rely on the secrecy of the code. Biometric readers bind access to a fingerprint, face, or palm print and are the strongest proof that the person presenting the credential is the authorized user, though they add sensor cost and privacy considerations. Some readers combine two of these, which is the basis of multifactor authentication at the door. Many systems mix families, using a card plus PIN for high-security doors and a single credential type elsewhere, so the practical skill is choosing a family that matches your user population and your threat model rather than the cheapest option. Together these credential families define both the user experience at every door and the administrative effort required to issue, replace, and revoke identities over the life of the system.
Choose the credential family against your real user population and churn rate. A high-turnover tenant building may value instant mobile provisioning, while a low-traffic equipment room may be fine with a keypad. Where compliance matters, look for a system that logs which credential was presented, at which door, and at what time.
Card and Fob Credentials
Card and fob credentials are the workhorse of the industry because they are cheap, durable, and easy to manage at scale. The oldest family operates at 125 kHz and is essentially a read-only identifier; it is simple and inexpensive but offers little protection against cloning, which makes it a poor fit for exterior perimeters in higher-risk facilities. The newer family operates at 13.56 MHz and includes cards that support cryptography, so the reader and card perform a mutual challenge-and-response exchange that makes copying the credential far harder. High-security variants add even stronger key management and are commonly required for facilities such as data centers and research spaces where a duplicated badge is an unacceptable risk.
Many organizations standardize on a 13.56 MHz smart card as the common denominator, then layer additional applications on the same card, such as a cafeteria payment purse, a copier authorization, or a time-and-attendance function. A single card that does many jobs reduces issuance cost and user friction. The card also becomes a physical inventory item that must be ordered, printed, tracked, and revoked, which is why card management software and a defined issuance process are part of a mature program.
Mobile Credentials
Mobile credentials replace the plastic card with a token delivered to a smartphone, which changes the economics of issuance and revocation. Because the token is delivered over the air, a new hire can be provisioned before they arrive and a terminated employee can be revoked instantly without recalling a physical badge. For buildings with high tenant or employee churn, this alone can pay for the system. Mobile credentials also survive loss differently: a lost phone is unlikely to grant access to someone who finds it, because the phone itself is typically locked.
The trade-offs are practical. Users must carry a charged phone, and the building must provide a way to provision and manage the mobile app. Mobile credentials pair naturally with Bluetooth Low Energy readers, and they integrate with identity platforms so that a single app carries access across multiple buildings. Privacy-conscious organizations should document how the phone's location is used and ensure the credential platform does not track employees beyond the access events it is authorized to record.
PIN Keypads and Biometrics
PIN keypads are the oldest electronic credential and remain useful where simplicity and cost dominate, such as a mechanical room or a small tenant suite. A PIN is easy to revoke by deleting the code, but it is also easy to share or observe, so keypads should be reserved for lower-sensitivity openings unless they are combined with a card as a second factor.
Biometric readers bind access to a physical characteristic and are the strongest proof of identity at the door because the credential cannot be lent or duplicated in the way a card can. Fingerprint, face, and palm readers each carry different privacy expectations and environmental sensitivities, and they require enrollment, which adds to onboarding time. Biometric data must be handled under clear policy, and in many jurisdictions the storage of biometric templates is regulated. A common pattern is to use biometrics at high-security interior doors while relying on cards or mobile credentials at the perimeter, where throughput and weather matter more.
Commercial Building Access Control Guide Planning Steps
Planning a commercial building access control rollout follows a repeatable sequence. First, inventory every opening you need to secure and classify it as perimeter, interior, or high-security. Second, define the user roles and the zone each role may enter, and decide whether access is time-based, level-based, or both. Third, choose the credential family and the fail mode, remembering that a fail-safe lock releases on power loss to allow escape, while a fail-secure lock stays locked and suits exterior doors. Fourth, plan the network, deciding between wired controllers and wireless locks and confirming that power is available at each door. Fifth, select management software that matches your door count and reporting needs. Finally, schedule commissioning, staff training, and a trial period before full go-live. Working through these steps in order prevents the most common retrofit failures, because each decision constrains the next and skipping ahead forces expensive rework at a later stage.
The failure mode decision is the one to get right first, because it affects life safety and cannot easily be changed later. Confirm local fire and accessibility codes with a qualified professional, since egress requirements and disabled-access regulations can override the default fail mode.
Inventorying Openings and Zones
The planning process begins with a complete inventory of openings, and the quality of this inventory determines everything that follows. Walk the building and record every door that needs control, including main entrances, interior office doors, conference rooms, storage areas, mechanical rooms, stairwell doors, and loading docks. For each opening, note the frame material, the door leaf type, whether it is single or double, the direction of swing, the presence of a panic bar, and the surrounding environment. These details decide which locking hardware can be installed and which readers can survive the location.
Once the openings are inventoried, group them into zones that express your security policy. A zone is a set of doors and areas that share the same access rights, such as the public lobby, the general office floor, the server room, and the loading dock. Defining zones early lets you express policy as zone-to-role mappings instead of door-by-door lists, which is far easier to audit and to change when the organization reconfigures its space. Each opening is then assigned to a zone and, within that zone, given a fail mode, a credential requirement, and a schedule.
Defining Roles, Schedules, and Access Levels
With zones in place, you define the roles that will move through them. A role is a named collection of permissions, such as Employee, Contractor, Visitor, or Facilities. Each role is mapped to the zones it may enter and the hours it may do so, producing an access level that the system applies to every holder of that role. Time-based access restricts when a credential works, such as normal business hours or a specific shift; level-based access restricts which zones a credential reaches, such as an executive who can enter the server room while a general employee cannot.
Most systems let you combine both dimensions, and most organizations should, because a security program is only as strong as its least-privilege discipline. The audit value of clear roles is that a change to a role updates every holder at once, so when a department moves floors you adjust one role rather than hundreds of individual cards. During planning you should also decide how holidays, after-hours access, and emergency overrides behave, because these edge cases are where real-world policy most often breaks down.
Selecting the Fail Mode
The fail mode is the single most consequential physical decision in the plan, because it is a life-safety choice that is expensive to reverse. A fail-safe lock releases when power is lost, so occupants can always escape and the door does not trap anyone during an emergency; this is the correct default for almost every interior door and most egress paths. A fail-secure lock remains locked when power is lost, which protects the opening but can trap occupants unless a mechanical release, panic bar, or battery backup is provided; this suits exterior perimeters and high-security doors where protection during a power outage outweighs convenience.
Egress and accessibility codes often dictate which fail mode is acceptable, and these codes vary by jurisdiction, so the plan should be reviewed by a qualified professional before hardware is ordered. Where a fail-safe release is required for life safety, you also need a reliable power source and, typically, a monitored request-to-exit device so the door does not simply stay unlocked after a momentary power blip. Getting the fail mode right at planning time prevents the most expensive retrofit of the entire project.
Planning Power and Network
Every controlled door needs power and, in most designs, a network connection, and neither can be assumed. Wired controllers require a local power supply rated for the locks and readers they drive, and they need a path to the management server over the building's network. Wireless locks avoid running cable to the lock but consume batteries that must be replaced on a schedule, and they still need some form of network connectivity for events and configuration. The planning task is to walk each opening and decide which topology works, then confirm that power actually exists or can be brought in.
Battery backup deserves specific attention, because a loss of building power should not disable access entirely. At minimum, controllers on perimeter doors should have a backup supply sized to keep them functioning through a power outage, and the request-to-exit and egress paths must remain operable under their own power or fail open. Documenting the power budget per controller and per door is a deliverable of the planning phase, not something to discover during commissioning.
Commercial Building Access Control Guide Integration
Integration is what turns a door lock into a building system. A well-integrated access control platform exchanges events with video surveillance, so a door-forced alarm is accompanied by the relevant camera clip. It synchronizes with the HR directory so a terminated employee loses access automatically and a new hire is provisioned without an administrator touching each door. It feeds visitor management, elevator control, and lighting or HVAC scheduling, so an entry event can trigger floor lighting or the access profile can restrict which floors a card reaches. Open integration standards such as OSDP for readers and REST or webhook APIs for software let you avoid vendor lock-in and add systems later. Establish the integration points during planning rather than after installation, because retrofits are more expensive and introduce compatibility risk, and because the whole value of the platform is realized only when events move between systems.
Verify that any third-party system you plan to connect exposes the interface the access platform expects, and document the data flows so you know what happens when a shared service goes offline.
Video Surveillance Integration
Access control and video surveillance are natural partners, and their integration is usually the highest-value connection a building can make. When the access system detects a forced door, a door held open, or a denied credential at a sensitive door, it can trigger the camera system to capture the moment and flag the clip for review. The result is that security staff investigate a video record of the event instead of a bare alarm. This pairing also supports verification of normal activity, such as confirming that a badge swipe at a loading dock corresponds to a delivery at the dock door.
The integration is typically accomplished through a shared event bus or an API where access events are pushed to the video platform, which matches them to camera timecodes. A practical design decision is to capture the reader itself in the camera frame so the video shows both the person and the door they opened. Establish which events should trigger video recording and how long clips are retained, because unlimited recording is expensive and most events do not need one.
HR Directory and Identity Synchronization
The single most valuable automation in access control is synchronization with the human resources directory, because it closes the two gaps that manual administration always leaves open: provisioning new hires and revoking departing employees. When the identity platform is the source of truth, an employee's card or mobile credential is issued automatically when they join, their role maps to an access level, and their access is revoked the moment their employment record changes. Manual administration, by contrast, depends on a busy administrator remembering to act, and every day a terminated employee keeps access is an unacceptable risk.
Integration is a two-way discipline. The access system consumes the identity feed and returns event data that HR or security can use for reporting. Before implementation, agree on the mapping between HR attributes and access roles, define how contractors and visitors are handled, and decide what happens when the identity feed is unavailable. A well-designed sync makes onboarding a new hire and terminating a leaver routine, predictable, and auditable.
Visitor Management, Elevators, and Building Automation
Access control also connects to the broader building, and several integrations are worth planning explicitly. Visitor management software can issue a temporary credential when a guest checks in, giving the visitor access only to the lobby and the meeting room, and expiring that access automatically when the visit ends. Elevator control uses the access profile to decide which floors a credential can select, so a card that opens the front door does not necessarily reach every floor. Building automation can react to access events, turning on lights and adjusting HVAC in a space shortly before a scheduled entry and returning it to energy-saving mode when the space is empty.
Each integration is a contract with defined data flows, and each should be tested at commissioning. The recurring theme is that access events are a rich source of occupancy and movement data, and the building can act on that data only if the integration was designed in advance. Document every third-party interface, and define how the system behaves when a shared service such as the visitor platform or the elevator controller is offline, so the failure mode is known rather than discovered.
Commercial Building Access Control Guide Opening Types and Hardware Selection
Not every opening in a building should be secured the same way, and one of the most useful planning habits is to group openings by their role in the perimeter and interior security model. Main entrances, interior office doors, stairwell and mechanical doors, and loading docks each have different traffic patterns, exposure, and safety obligations, so each deserves a distinct hardware recommendation. Perimeter openings face the outside world and must resist forced entry while also handling continuous traffic and weather; interior openings mostly deter casual intrusion and carry egress obligations; and service openings such as loading docks balance security with operational speed. Planning by opening type also makes the design reviewable, because a reviewer can check that every opening of a given class was treated consistently rather than tracing each decision individually, and it forces the trade-off between security strength, throughput, and maintenance to be stated openly for each class of door.
Perimeter and Main Entrance Openings
Main entrance doors are the public face of the building and often the highest-traffic openings in the system, so the priorities are throughput, appearance, and reliable life-safety behavior. A common design pairs a credential reader outside with a fail-safe electric strike or an electrified mortise lock, a request-to-exit device on the inside, and a door position sensor to detect forced or held-open doors. Because the entrance handles many users, reader placement and mounting height must be planned so that cards and mobile credentials present cleanly and users do not bottleneck.
Perimeter openings must also resist attack. The frame, the strike, and the door leaf all contribute to the opening's resistance, and a strong lock on a weak frame is poor security. Readers at perimeter doors should use a credential technology that resists cloning, such as a 13.56 MHz smart card or a mobile credential, and the reader-to-controller link should be secure. Exterior readers need an environmental rating appropriate for rain and temperature swings, and the power supply for a fail-safe perimeter lock needs backup so the entrance does not release prematurely or fail closed on a power loss.
Interior Office and High-Security Doors
Interior doors are where the bulk of the access policy is expressed, and they carry a different set of obligations than the perimeter. Most interior doors should be fail-safe so that occupants can always egress, and they typically use a lower-grade lock than the perimeter because the threat is casual intrusion rather than forcible attack. An electrified mortise lock is common on interior doors because it keeps the door mechanically latchable and leaves a familiar lever for normal passage, with an electric release driven by the controller.
High-security interior doors, such as those protecting a server room, a data center, a lab, or a cash handling area, justify a stronger combination. These doors often use a higher-strength locking layer, a multifactor credential such as a card plus PIN or a biometric reader, a monitored door position sensor, and a schedule that limits hours tightly. The audit log for high-security doors should capture every grant and denial with a timestamp and identity, because these openings are where a security incident is most likely to be examined later. Selecting hardware for high-security doors is largely a matter of forcing both strong authentication and complete logging.
Loading Docks and Service Openings
Loading docks and service openings are a special class because they combine continuous operational traffic with significant security exposure. A dock is where deliveries, contractors, and maintenance personnel enter, and it is often one of the least controlled points in a building. The design goal is to make authorized traffic fast while keeping unauthorized entry difficult, which usually means a reader for credentialed personnel, a monitored exterior, and a clear procedure for handling unscheduled deliveries and dock doors.
The physical constraints at a dock differ from an office door. Dock openings are large, exposed to weather, and often fitted with overhead doors or roll-up doors that use their own mechanisms rather than a conventional latch. Access control at a dock may therefore supervise the overhead door release and the pedestrian door beside it, record delivery events, and integrate with a visitor or vendor management process so that unscheduled arrivals are screened. Docks should also have a defined procedure for door-held-open conditions, because a dock door left open is a common way a building loses both security and conditioned air.
Commercial Building Access Control Guide Scheduling, Anti-Passback, and System Rules
Beyond deciding who may enter, a mature access control program uses rules to govern when and how access happens, and these rules are configured in the management software. The most common rules are door schedules, which restrict which days and hours a credential works; holiday calendars, which overlay the regular schedule; anti-passback, which prevents a single credential from being used to re-enter an area; and time zones that bind users to shifts. Each rule is an expression of policy, and each should be designed, documented, and tested rather than enabled by default without thought. The value of these rules is that they turn a static list of who-can-enter-where into a living policy that matches how the building actually operates, while the risk is that a rule configured incorrectly can lock out legitimate users or silently permit an intrusion, which is why rule changes should follow the same change-control and testing discipline as hardware changes.
Scheduling and Holiday Calendars
Door schedules are the most basic and the most heavily used rule. A schedule defines when a door is accessible, and it can be applied either to the door, so that a particular door is only usable during business hours, or to a user role, so that a shift worker only has access during their shift. Combined schedules allow a door to be open during business hours for everyone and restricted after hours to a maintenance role, which is the classic office configuration.
Holiday calendars overlay the normal schedule, and they are a frequent source of errors because buildings operate on regional and organizational holidays that shift each year. A good implementation maintains a holiday calendar in the software, reviews it annually, and tests that a holiday truly behaves as intended before the day arrives. Scheduling also interacts with the audit log, because a denied event after hours is often the first signal of a problem, so the configuration should produce a meaningful event for both grants and denials.
Anti-Passback and Tailgating Mitigation
Anti-passback is a rule that prevents a credential from being reused to pass back out of a secured area, which blocks the practice where one person hands a card to another after entering. In its strictest form, once a credential is used to enter a zone, it cannot be used to enter again until it has exited; in a softer form, the system simply raises an alarm or logs a warning when the pattern is detected. Anti-passback is most valuable in high-security zones and least valuable in public areas, where it can create frustrating false alarms.
Anti-passback cannot by itself stop tailgating, where an unauthorized person slips in behind an authorized one before the door closes. Mitigating tailgating requires physical controls such as mantrap portals, turnstiles, or door position monitoring with alarm response, and these are best combined with the video integration described earlier so that an alarm is investigated with footage. Planning anti-passback and tailgating controls means deciding which zones genuinely need them, because they add operational friction and should be reserved for the areas where the risk justifies it.
Commercial Building Access Control Guide Power, Wiring, and Controller Design
The physical infrastructure of an access control system is where projects most often run late and over budget, because it is invisible in the sales comparison and entirely visible in the installation. Power, wiring, and controller placement determine whether a design is practical, serviceable, and resilient, and each trades installation cost against ongoing maintenance while interacting with the building's existing conduits, risers, and power closets. The plan should specify, for every door, how it is powered, how it communicates, and which controller supervises it, and it should document those decisions in a way a future technician can understand. Three recurring infrastructure decisions shape the design: wired versus wireless locking, centralized versus distributed controllers, and the nature and redundancy of the power and network, and getting each of these right at planning time is what keeps an installation on schedule and a system serviceable for its whole life.
Wired versus Wireless Locks
Wired locks connect directly to a controller and a power source, which gives them reliable power, immediate communication, and no battery replacement, at the cost of running cable to each door. Wired designs are the traditional choice for commercial buildings where the conduit, riser, and ceiling space exist to carry the cable, and they remain the best option where doors are clustered and power is available nearby. The ongoing cost is low because there is nothing to re-battery and firmware can be managed centrally over the network.
Wireless locks use batteries and a wireless link, which removes the cable run and makes retrofits far cheaper on doors where pulling wire is impractical or prohibited by the building's construction. The trade-offs are battery replacement on a schedule, a need to monitor battery status, and a communication medium that can be affected by range and interference. Wireless locks are a strong choice for interior doors in historic or leased buildings where structural changes are restricted, and they are increasingly used in combination with wired controllers for the perimeter. The decision is fundamentally about cable access versus maintenance, and it should be made door by door rather than globally.
Controller Placement and Cabinet Design
Controllers are typically installed in a cabinet near the doors they supervise, and the layout of these cabinets determines how much cable is needed and how easy the system is to maintain. A distributed design places a controller close to each door cluster, which shortens cable runs but spreads the hardware across the building; a centralized design concentrates controllers in a few secure rooms, which concentrates power and network infrastructure but requires longer cable runs to distant doors. Most buildings end up with a hybrid, locating controllers in electrical or IDF closets near clusters of doors.
Each controller cabinet needs a defined power budget, a network drop, and physical security, because a controller left in an unlocked closet is an easy attack point. The cabinet should be sized for growth, labelled, and documented with a schematic showing which doors it drives. Battery backup should be designed at the cabinet level so that a power failure does not disable an entire floor, and the design should state how long each cabinet must survive on backup power.
Power Sizing and Backup
Power is the most failure-prone part of an access control system, and it deserves the same rigor as the hardware. Every lock, reader, and controller has a current draw, and the power supply must be sized to cover the connected load with margin, including the surge when several locks energize at once. A reader at the far end of a long cable run needs enough voltage at the device, not just at the supply, so cable gauge and distance are part of the power calculation.
Backup power is a policy decision expressed in hardware. Perimeter and life-safety doors need enough battery backup to remain secure and egressible through a realistic outage, while interior doors may be allowed to behave according to their fail mode. The design should specify backup duration, battery monitoring, and a testing routine, because a backup that fails on the day it is needed is worse than none. Documenting the power budget per cabinet and per door is a deliverable that a competent installation depends on.
Commercial Building Access Control Guide Cybersecurity and IT Considerations
Modern access control is a networked IT system, which means it shares the security obligations of any networked system. The management server, the controllers, and the reader links are all attack surfaces, and a compromised access system is a direct path to physical intrusion. Cybersecurity in this context covers protecting the management server and its data, securing the communication between server and controllers, protecting credentials and the identity data behind them, and integrating with the organization's broader IT security posture.
The conversation between security and IT teams is often one of the most valuable parts of the planning process, because each side brings a different view of the same risk. The access control vendor should provide guidance on hardening, and the IT team should review it against the organization's standards before deployment, not after an incident.
Protecting the Management Server
The management server holds the access database, the credential records, the audit log, and the administrative interface, which makes it the crown jewel of the system and the primary target for attack. It should be patched on a schedule, protected by strong authentication for administrators, and restricted to a controlled network segment rather than exposed to the general office network. Administrative access should be limited to named individuals, and all administrative actions should themselves be logged so that changes to access rights are accountable.
The server also needs a backup and recovery plan, because losing the access database can mean re-provisioning every credential in the building. Backups should be tested, encrypted, and stored separately from the live server, and the plan should state how quickly access can be restored after a server failure. Organizations increasingly move the management platform to the cloud, which transfers some of this responsibility to the provider but requires its own due diligence on the provider's security, data location, and access controls.
Securing Controllers and Reader Links
The controllers and the links to the readers are physical infrastructure, but they carry the same trust as the software. A controller in an unlocked cabinet can be tampered with or reprogrammed, so controller cabinets should be physically secured and monitored. The reader-to-controller link deserves particular attention because legacy Wiegand wiring transmits credential data in a way that can be intercepted or cloned; migrating readers to OSDP, which encrypts and authenticates the reader link, materially hardens the door against wire attacks.
Firmware on readers and controllers must be kept current, because access control hardware is not immune to vulnerabilities and a known flaw in an unpatched controller is a standing risk. The deployment plan should include a firmware update and patch management process, and the vendor contract should state how long security updates are provided. Treating the physical access system as part of the organization's IT asset inventory is the single most effective way to keep it secure over its service life.
Identity Data and Privacy
Access control systems hold sensitive data: who is allowed where, when, and with what credentials, along with names, identifiers, and potentially biometric templates. This data is subject to privacy obligations in many jurisdictions, and the deployment should define how it is collected, stored, retained, and deleted. Biometric data is the most sensitive category, and its handling should follow documented policy and, where applicable, regulatory requirements for consent and storage of biometric templates.
Access event data is also valuable to an attacker because it reveals patterns of occupancy and movement, so the audit log should be protected, retained for an appropriate period, and accessible only to authorized personnel. Privacy and security should be addressed in the procurement requirements rather than improvised after deployment, because retrofitting data protection into a system that was not designed for it is difficult and expensive.
Commercial Building Access Control Guide Tenant, Owner, and Multi-Tenant Operation
Access control operates differently depending on who owns and operates the building, and the ownership model changes the requirements substantially. A single-tenant building where the occupier owns the system has one set of needs; a landlord-owned multi-tenant building has another; and a building where tenants install their own systems inside a landlord-managed shell has yet another. Clarifying the ownership model early avoids the most common disputes about who controls, pays for, and maintains what.
The ownership model also determines how credentials, zones, and integrations are managed, and whether a single platform or multiple platforms will be needed. In a multi-tenant building, the landlord typically controls the shared perimeter and common areas while each tenant controls its own suite, and the two layers may run on entirely separate systems.
Single-Tenant Owner Operation
In a single-tenant building, the organization that occupies the building usually owns and operates the access control system, which gives it complete control over policy, data, and hardware. The advantages are simplicity and accountability: one team defines roles, one platform holds the access database, and one contract covers maintenance. Single-tenant operation also makes integration simpler, because the HR directory, video, and access systems are all managed by the same organization and can share an identity source.
The main discipline for a single-tenant deployment is to keep the system aligned with the organization as it changes, because a system built for one headcount and layout is often allowed to drift as the company grows. Regular reviews of roles, zones, and the audit log keep the system truthful. Single-tenant owners also own the upgrade and lifecycle decision, so they should plan for the eventual replacement of readers and controllers rather than treating the system as permanent.
Landlord-Owned Multi-Tenant Operation
In a multi-tenant building, the landlord typically owns and controls the perimeter system, the common-area doors, the elevators, and the shared visitor experience, while each tenant controls access within its own suite. The landlord-managed layer sets the standard for how the building works, and it must accommodate a diverse set of tenants with different hours, staff sizes, and security needs. The perimeter platform may hold credentials for every tenant's employees and visitors, which makes provisioning and revocation at scale a core requirement.
The interface between the landlord layer and the tenant layer is the point that needs the most planning. Tenants may install their own readers and locks inside their suites, and the landlord must decide whether those tenant systems interoperate with the building platform or run independently. When they run independently, the landlord still needs a way to open tenant doors for emergencies and maintenance, so the agreement should define access rights, notification, and liability. A well-run multi-tenant building treats access control as a shared service with clear boundaries, not as a single system owned by everyone.
Tenant-Installed and Hybrid Models
A hybrid model is common in leased offices and multi-use developments, where the landlord provides the shell and core access and each tenant installs and operates a separate system inside its leased space. The tenant system may be a small commercial panel or a set of wireless locks managed through its own software, and it is completely under the tenant's control. This model gives tenants flexibility and privacy, at the cost of some duplication and a lack of integration with the building platform.
The practical challenges are coordination and egress. Tenant doors still sit within the landlord's fire and egress design, so tenant-installed hardware must satisfy the building's safety requirements even though it is not on the landlord's system. The two systems also need agreed exception handling, so that emergency responders and building management can open tenant doors when necessary. Documenting these cross-boundary rules in the lease and the building operating procedures prevents conflict later, and it is a task best done when the tenant system is first installed rather than during an incident.
Commercial Building Access Control Guide Commissioning, Acceptance, and Testing
The installation is not finished when the hardware is mounted; it is finished when the system has been commissioned, accepted, and shown to behave correctly under the full range of operating conditions. Commissioning is the phase where the design assumptions are tested against the real doors, the real users, and the real building, and it is where most defects surface. A structured commissioning and acceptance process, with written test evidence, turns an installation into a system that can be operated with confidence.
Commissioning should cover hardware, wiring, power, software, rules, and integrations, and it should be documented so that the results are reviewable and the building manager inherits a record of what was verified. Acceptance is the contractual step where the owner signs off that the system meets the specification, and it should be tied to demonstrated results rather than to the vendor's promise.
The Commissioning Sequence
Commissioning typically proceeds door by door before it proceeds system wide. For each opening, the installer verifies that the lock operates, the reader reads the intended credentials, the controller makes the right grant and denial decisions, and the request-to-exit and door position sensors report correctly. Each door is tested in its fail mode by cutting power and confirming the door behaves as designed, because a fail-safe door that stays locked on power loss is a life-safety failure that must be caught before occupancy.
After individual doors pass, the team tests the rules and the software: schedules, holiday calendars, anti-passback, revocations, and alarm handling. Finally, the integrations are exercised, with a test credential triggering a video clip, an HR record change revoking access, and a visitor credential expiring as intended. Each test produces written evidence, and a commissioning report records every door, every test, and every pass or fail. The report is the deliverable that makes the acceptance decision possible.
Acceptance and Handover
Acceptance is the point where the owner confirms the system meets the specification and takes operational responsibility. A well-run acceptance process uses the commissioning report as its foundation, then adds a trial period during which the system runs in normal operation and defects are collected and fixed. The acceptance criteria should have been agreed in the procurement documents, so both parties know what passing looks like before the work begins.
Handover is the operational transfer, and it should include training for the administrators who will manage credentials and the technicians who will service the doors. The owner should receive complete as-built documentation, including the door-by-door schedule, the power budgets, the controller layouts, the integration interfaces, and the recovery procedures. A system handed over without documentation is a system that no one can safely own, so the quality of the handover is a fair measure of the quality of the installation.
Commercial Building Access Control Guide Maintenance, Recovery, and Lifecycle Management
Once accepted, the system enters the phase where its real cost and its real value are decided: operations. Access control is rarely a set-and-forget installation, because buildings change, people change, and hardware ages. A maintenance program, a recovery plan, and a lifecycle view keep the system secure and reliable over the years that it will actually serve the building, and they are as important to the business case as the original hardware purchase.
Maintenance covers both the routine and the reactive. Routine work includes battery replacement, firmware updates, reader cleaning, and credential housekeeping; reactive work covers failed locks, damaged readers, and alarm response. The plan should define who does each, on what schedule, and at what cost, and it should be reviewed regularly so that it keeps pace with the building.
Routine Maintenance and Battery Programs
For wireless locks, battery management is the largest recurring maintenance item, and a disciplined battery program prevents the failure that wireless designs are most exposed to: a door that stops responding because its battery is flat. The system should monitor battery status and alert before a lock fails, and the maintenance calendar should schedule replacement on the manufacturer's guidance. Because batteries fail faster in extreme temperatures and high-traffic doors, the program should weight replacement by door condition rather than treating every door identically.
Firmware updates are a security maintenance task as well as a functional one, because they carry the patches that close vulnerabilities. Updates should follow a change-control process, tested on a sample door before rollout, and scheduled during low-traffic hours so a brief reboot does not interrupt occupancy. Reader cleaning and inspection are simple but important, because a reader with a damaged surface or a loose mount will fail eventually and a dirty biometric sensor will frustrate users.
Incident Response and Recovery
The recovery plan answers the question of what happens when something fails, and it is best written before the failure occurs. Common scenarios are a controller failure, a network outage, a server loss, and a mass lockout when credentials cannot be validated. For each scenario, the plan should state the expected behavior, who responds, and how access is restored, and it should be tested, because a recovery plan that has never been exercised usually fails on the day it is needed.
The plan should also cover the unusual but consequential cases: a lost master key to the access database, a compromised administrator account, or a suspected breach of the credential system. A documented procedure for these events, including who is authorized to take emergency action, protects the building and limits the damage. Recovery is the last line of defense in access control, and like the fail mode decision, it is far cheaper to design well in advance than to improvise during an incident.
Lifecycle Budgeting and Replacement
The lifecycle view of access control treats the system as a depreciating asset with a finite service life rather than a one-time purchase. Hardware reaches end of life, software goes out of support, and a system that is not upgraded eventually becomes both a security risk and an operational liability. The lifecycle budget should therefore include not just the original purchase and ongoing maintenance, but the eventual replacement of readers, controllers, and software, and it should anticipate the migration effort that replacement involves.
The contract terms set the ceiling for the lifecycle cost. The agreement should state how long firmware and security updates are provided, what the end-of-support date is, whether spare parts remain available, and how the vendor migrates data and configuration to a successor platform. A building that asks these questions before purchase avoids the most expensive surprise in access control: being forced into a rip-and-replace because the incumbent product went end-of-life with no clear path forward.
Commercial Building Access Control Guide Procurement and RFP Guidance
Procurement is where the planning work pays off, because a well-specified request for proposal produces comparable bids and a defensible decision, while a poorly specified one produces apples-to-oranges quotes and post-award disputes. The RFP should describe the outcomes the building needs, the openings to be controlled, the credential families, the integration targets, the fail-mode and egress requirements, the service and support expectations, and the lifecycle terms described in this guide. It should ask each supplier to respond to the same specification so that bids can be compared on a consistent basis.
The decision is a systems decision, so the evaluation should weigh the software, the support, and the integration ability at least as heavily as the hardware price. A low hardware price attached to weak software or short support is rarely a bargain over the ten-year life of the system.
Building the Specification
A strong specification starts with the inventory and the zone model developed during planning, and it turns them into explicit requirements. For each opening, the specification states the locking hardware, the fail mode, the reader type, the credential family, and the power and network assumptions, so that every supplier prices the same scope. For the software, it states the door count, the user population, the reporting depth, the integration interfaces, and the administrative and audit features expected.
The specification should also state the operational and lifecycle terms that matter most: firmware update policy, end-of-support commitment, response times for service, spare parts availability, and the process for migrating to a successor platform. Making these terms explicit in the RFP is what makes the lifecycle cost comparable across suppliers, and it is what prevents the post-award surprises that drain budgets and confidence.
Evaluating and Comparing Bids
Evaluating bids on a consistent basis requires a common evaluation framework, and the framework should be defined before the bids arrive. The obvious dimension is price, but it should be evaluated as lifecycle cost, including hardware, installation, licensing, credentials, maintenance, and projected replacement, rather than as sticker price alone. The other dimensions are capability against the specification, integration fit with the systems the building already uses, the quality and availability of support, and the supplier's history of security updates and product continuity.
A practical technique is to require each supplier to respond to the same questionnaire and to demonstrate its software and its integration behavior in a live or hands-on session, because written claims are easier than working systems. The winning bid is usually not the cheapest; it is the one that satisfies the specification, fits the integration targets, and offers a lifecycle cost and support commitment the building can live with. A comparison table, built from the same fields for every supplier, makes the decision transparent and defensible.
The Comparison Table
| Decision factor | Why it matters | Wired system | Wireless system |
|---|---|---|---|
| Installation cost | Cable runs dominate retrofit price | Higher, needs conduit and power at each door | Lower, no cable to the lock |
| Ongoing maintenance | Drives lifecycle cost | Low, no batteries to replace | Higher, scheduled battery replacement |
| Power reliability | Locks must behave correctly | Reliable, supplied power | Depends on battery monitoring |
| Retrofit friendliness | Historic and leased buildings | Limited by structure | Strong, minimal structural change |
| Event latency | Alarms and monitoring | Immediate | Depends on wireless link |
| Best-fit openings | Match hardware to exposure | Perimeter and high-traffic doors | Interior and structurally restricted doors |
| Credential family | Security | Convenience | Issuance cost | Best fit |
|---|---|---|---|---|
| 125 kHz card or fob | Low, easily cloned | Very high | Very low | Interior, low-risk |
| 13.56 MHz smart card | Higher, cryptographic | High | Low to medium | General commercial default |
| Mobile credential | High | High, but needs a charged phone | Very low at scale | High-churn buildings |
| PIN keypad | Low unless combined | Low | Minimal | Mechanical rooms |
| Card plus PIN | High, multifactor | Medium | Low | High-security doors |
| Biometric | Very high | Medium, needs enrollment | Medium to high | High-security interior |
Commercial Building Access Control Guide A Worked Decision Example
To make the framework concrete, consider a worked example of a mid-sized office building retrofit. The building has one main entrance, a loading dock, and interior doors across three floors, with a stable tenant population of about two hundred employees and a modest visitor flow. The goals are to secure the perimeter, control the dock, manage roles and schedules across the interior, and keep a defensible audit trail, all within a lifecycle budget that favors reliability over the lowest possible first cost.
The analysis starts with the openings. The main entrance gets a fail-safe electric strike, a 13.56 MHz smart card reader with OSDP to resist cloning, a request-to-exit device, and a door position sensor, with battery backup on the perimeter controllers. The dock gets a supervised reader, a pedestrian door with an electrified lock, and a visitor and delivery procedure tied to the visitor management integration. Interior doors get electrified mortise locks that are fail-safe for egress, with the server room and a cash handling area upgraded to card plus PIN and full audit logging.
Credentials are standardized on a 13.56 MHz smart card, with mobile credentials offered as an option to reduce issuance cost as the tenant population turns over. Integration priorities are set early: video surveillance so a forced door produces a clip, the HR directory so access is provisioned and revoked automatically, and the elevator so that cards reach only the floors their role permits. The lifecycle budget includes battery-free wired interior locks where the ceiling space allows, firmware and security update terms written into the contract, and a documented replacement plan for readers at their end of life.
Commissioning is run door by door with written evidence, the fail mode of every door is tested on power loss, and the integration tests cover a forced-door clip, an HR revocation, and a visitor credential expiring on time. The acceptance handover includes administrator training, the as-built door-by-door schedule, power budgets, and recovery procedures. The result is a system whose security, cost, and maintenance were decided deliberately rather than inherited, and one that a future facilities team can operate and extend without re-discovering the building from scratch.
Confirm legal, fire, accessibility, cybersecurity, and engineering requirements with qualified professionals before you act on this guide, and validate every hardware choice against current model-specific documentation for the opening you are securing.
Part of this article content is generated by AI and optimized for professional accuracy and readability.
不确定哪款传感器适合您的项目?
与我们的毫米波应用工程师免费咨询。